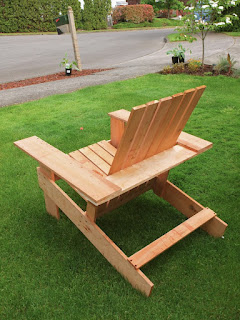
Building Your First Wooden Chair: A Beginner's Guide
The satisfying heft of a handcrafted wooden chair, the smooth curve of the seat, the sturdy legs supporting you – it's a feeling unlike any other. This guide walks you through building your very first chair, a simple yet rewarding project perfect for beginners. We'll focus on a basic design, ensuring you build confidence and skills for more ambitious projects later. Get ready to experience the magic of woodworking!
Choosing Your Materials and Tools
Before you even pick up a saw, gather your supplies. The success of your project hinges on selecting quality materials and having the right tools at your disposal. This project uses readily available lumber and basic tools, making it perfect for novices. Don't skimp on quality – investing in good materials pays off in the long run.
Essential Materials:
- Four pieces of 1x4 lumber (approximately 18 inches long for legs)
- Two pieces of 1x6 lumber (approximately 16 inches long for seat supports)
- One piece of 1x8 lumber (approximately 16 inches long for the seat)
- Wood glue
- Wood screws (1 1/4 inch and 2 inch)
- Wood stain or paint (optional)
Essential Tools:
- Measuring tape
- Pencil
- Hand saw or circular saw
- Drill with drill bits (matching your screws)
- Screwdriver
- Sandpaper (various grits)
- Safety glasses
Constructing the Chair's Frame
Now for the fun part – building the chair's structure! Accuracy is key here; take your time and double-check your measurements. Precise cuts and even spacing will ensure a sturdy and aesthetically pleasing chair.
Assembling the Legs:
Begin by laying out your 1x4 leg pieces. Using your pencil and measuring tape, mark where you will attach the seat supports. Pre-drill holes to prevent splitting the wood, then secure the legs to the seat supports with wood screws. Remember to use wood glue for added strength and stability.
Attaching the Seat Supports:
Position the 1x6 seat supports between the pairs of legs, ensuring they are level and parallel to each other. Pre-drill pilot holes and then firmly attach the supports to the legs with wood screws. Check for squareness throughout the process to guarantee a balanced chair. The legs should form a sturdy rectangle, providing a firm base for your seat.
Completing Your Chair
With the frame complete, you're in the home stretch! This stage focuses on adding the final touches – the seat and a bit of cosmetic enhancement.
Attaching the Seat:
Carefully place your 1x8 seat board on top of the seat supports. Pre-drill pilot holes through the supports into the seat board, and secure it using wood screws. Ensure the seat sits evenly across the supports, providing a comfortable and stable surface.
Sanding and Finishing:
Once everything is securely fastened, sand the entire chair thoroughly. Start with coarser sandpaper to remove any rough edges or imperfections, gradually moving to finer grits for a smooth finish. Clean the chair, then apply your chosen wood stain or paint for protection and enhanced aesthetics. Let it dry completely before using your chair.
Congratulations! You've Built Your First Chair!
Admire your handiwork! You've successfully built a functional and beautiful wooden chair from scratch. This project is just the beginning – as you gain experience, you can explore more complex designs and techniques. Enjoy the satisfaction of creating something with your own hands, and get ready for your next woodworking adventure!


Comments
Post a Comment